If you love playing mini-golf but can’t go to the golf course regularly, then you must be looking for some alternative solutions.
How about owning a mini-golf course at home? Sounds expensive?
You can always go for a DIY project. This one-stop guide is all about building a 9-hole mini-golf course in your backyard.
Let’s do it!
Building Guide: Things to Do Before You Start
Now that you’re going to build a mini-golf course of our own, you’ll have to make sure of certain important things before the start of your DIY project.
Area
Whether you intend to build an indoor or outdoor setup, make sure that you have enough space for the construction.
Typically, a 9-hole mini-golf course can be built in a 140′ x 140′ area, which is approximately 0.5 acres. Make sure to clear at least that much space for flawless construction.
Shopping List
To build your mini-golf setup, you’re going to need supplies!
There’s a whole list of materials that are used in the construction of a mini-golf course. Make sure that you have all of them before you start. Here’s the list:
✅ 2×4-foot sheet of 3/4-inch medium-density fiberboard (for 1 panel)
✅ Five deck balusters (for 1 panel)
✅ Wood glue
✅ 1/2 yards of 72-inch-wide green felt (for 1 panel)
✅ Spray adhesive
✅ 3-inch PVC pipe fitting (coupling, cap, or adapter)
✅ 5 composite wood balusters (for 1 panel)
✅ Outdoor welcome mat or artificial turf
In addition to these materials, you’ll require the following tools:
✅ Miter box with a backsaw
✅ Drill/driver fitted with 4-inch hole saws
✅ Spring clamps
✅ Plastic drop cloth
✅ Utility knife
✅ Framing square
✅ Hacksaw
Cost
Before you start, make sure that you have enough money for the project.
The best way to ensure that is by making a cost estimate. Roughly, buying a 9-hole miniature golf course setup can cost you around $7,000, but making one on your own can be cheaper.
Building a 9-Hole Mini-Golf Course: Let’s Do it!
To make the build easy for you, I’ll break it down into steps using this YouTube video from This Old House YouTube channel as a reference guide:
Let’s do it!
Step 1: Plan the Layout
- Plan the layout of your golf course.
- Select the custom dimensions you want for different panels.
Take a look at this 9-hole mini-golf course by DoneRight Management McCall Vacation Rentals YouTube channel for a fantastic layout idea.
Step 2: Building a Panel
- Cut the MDF sheet according to the selected dimension for the panels.
- Cut the deck balusters according to the parameters of the MDF sheet.
- Use the wood glue to fix the balusters on the parameters of the MDF sheet.
- Give it a few seconds to dry.


Credit to This Old House
Step 3: Drill a Hole
- To drill the hole, mark the position in the center of the panel.
- Select a hole saw with equal diameter to the putting hole.
- Connect the hole saw to a drill machine and cut a hole at the marked position.

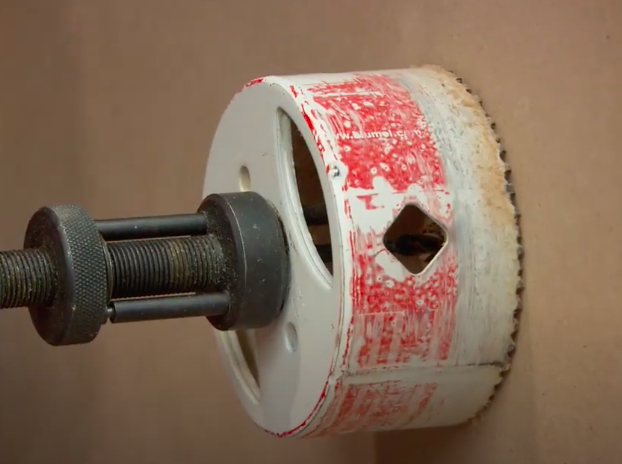

Credit to This Old House
Step 4: Glue the Felt to the MDF
- Take out the felt and thoroughly apply the spray adhesive on it.
- Apply the spray adhesive on the MDF in the same way.
- Stretch the felt on a plain surface.
- Grab the panel and place it on the felt with the adhesive surface in contact.
- Give it a few minutes to dry.
- Cut out the extra corners of the felt.
- Apply the adhesive spray on the deck balusters.
- Carefully stick the felt to the deck balusters.
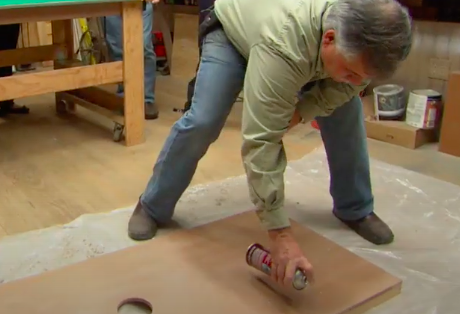


Credit to The Old House
Step 5: Put the PVC Plumbing Fitting
- Cut the felt through the hole, slicing it like a pizza.
- Stick the felt pieces on the opposite side of the MDF board using spray adhesive.
- Put the PVC plumbing fitting in the hole.


Credit to This Old House
Step 6: Finishing the Panel
- Use composite balusters on the upper parameters of the panels to keep the ball from rolling off the edge.
- Make the roughs using AstroTurf.
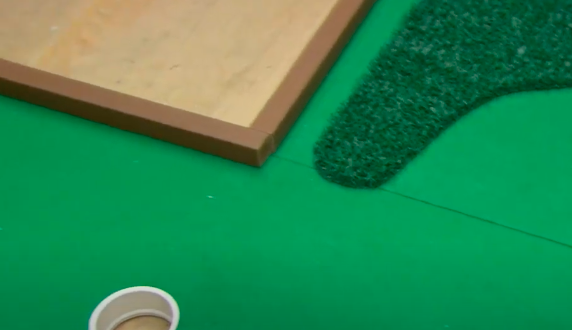
Credit to This Old House
Step 7: Setting Up the Golf Course
Once you’re done making the required amount of panels you want, it’s time to set up the golf course.
- Select the place where you’ll set up your miniature golf course.
- Clear out the surface.
- Position the panels according to the layout plan.
Step 8: Adding the Hurdles
You can add different obstacles according to your choice for different levels of competition.
Build a ramp or a loop-de-loop as shown in the video or simply put the obstacles on the panel to use them as hurdles.
Now that you’re done building your miniature golf course, give it a try!
Frequently Asked Questions
What is the size of a mini-golf hole?
The average depth of a mini-golf hole is 4 inches, and the average diameter is 4.25 inches.
How hard is mini-golf?
Playing mini-golf requires a specific skill set. You need to learn different techniques to play around obstacles, hold the club, and play with focus. Once you’ve mastered the basics, it’ll be fun to play mini-golf.
How many players can play a round of mini-golf?
It’s recommended to not exceed the limit of five players per round to play a comfortable and safe game according to mini-golf etiquette.
Conclusion
If you ever want to build a miniature golf course in your backyard, I’ll recommend you to follow the above given procedure because it’s simple, fast, and easy.
Since it’s a DIY project, there’s always room for customization.
You can design the layout, panels, and obstacles according to your choice, but make sure that you go with the right choices because slight errors can cause big problems.
In the end, it’s your course, your choice!